This tutorial is aimed for programmers with at least a little experience with Java. For introductory material on Java, check out Sun's Java Tutorial and Java Documentation, which can be accessed from Sun's Java home page. Information on how to compile and run programs is also available there. This page takes you step-by-step through compiling and running your first Java program. For the following tutorial, make sure to download and install JDK1.2 or JDK1.3 - also known as Java 2. The latest Java Development Kit can be downloaded here. The following tutorial introduces Java sockets and Swing separately before combining them into a TCP chat program. You can download this tutorial in zip format by clicking here.
Let's cover Java TCP sockets first since they are much simpler than Swing. The beauty of Java sockets is that no knowledge whatsoever of the details of TCP is required. TCP stands for Transmission Control Protocol and is a standard protocol data transmission with confirmation of data reception. That's as far as I know on the subject, and yet I managed to make a chat program.
In order to initiate a TCP session, a server and a client are required.
Firstly, a server is set up to listen at a given port. The server
waits and does nothing until a client attempts to connect that port.
If everything goes fine, the connection is successful and both the
server and client have an instance of the Socket
class. From each instance of this class, an input stream and an output
stream can be obtained, and all communication is done via these streams.
The Socket class is in the java.net package,
so be sure to say import java.net.*; at the beginning of
your file. The following is a simple example that illustrates the
different portions of a server/client pair. This example works using
localhost, which corresponds to the default local
computer IP address of 127.0.0.1. This way, both the server
and the client will be running on the same computer.
Server.java and
Client.java
contain the server and client source code for this simple example.
Server.java):
import java.lang.*;
import java.io.*;
import java.net.*;

class Server {
   public static void main(String args[]) {
      String data = "Toobie ornaught toobie";
      try {
         ServerSocket srvr = new ServerSocket(1234);
         Socket skt = srvr.accept();
         System.out.print("Server has connected!\n");
         PrintWriter out = new PrintWriter(skt.getOutputStream(), true);
         System.out.print("Sending string: '" + data + "'\n");
         out.print(data);
         out.close();
         skt.close();
         srvr.close();
      }
      catch(Exception e) {
         System.out.print("Whoops! It didn't work!\n");
      }
   }
}
The key portions of this program are in the try{} block.
The ServerSocket instantiation is what sets up the server
to listen at the given port. The server is automatically set up at the
computer on which it is run. The Socket instantiation on
the next line uses the accept() method of
ServerSocket. This method waits until a client attempts
to connect to the server, and it returns an instance of the
Socket class. This Socket instance
(skt) is now the "warp tunnel" through which we can
communicate with the client. skt.getOutputStream()
returns the output stream through which the server can talk to the
client, and skt.getInputStream() returns the input
stream through with the server can hear the client. This example
creates a PrintWriter instance using the output stream
for easier output and sends the data (stored in data)
to the client (out.print(data);). Bingo! Easy as that!
After everything is done, all the streams and sockets shuold be closed
before the program is exited. Now, let's see the client code.
Client.java):
import java.lang.*;
import java.io.*;
import java.net.*;

class Client {
   public static void main(String args[]) {
      try {
         Socket skt = new Socket("localhost", 1234);
         BufferedReader in = new BufferedReader(new
            InputStreamReader(skt.getInputStream()));
         System.out.print("Received string: '");

         while (!in.ready()) {}
         System.out.println(in.readLine()); // Read one line and output it

         System.out.print("'\n");
         in.close();
      }
      catch(Exception e) {
         System.out.print("Whoops! It didn't work!\n");
      }
   }
}
Once again, the meat of the program is in the try{}
block. A connection to the server is attempted through the
instantiation of the Socket class. It attempts to
contact the server at localhost through port 1234 -
the same port where the server is listening. Once the socket is
at hand, it works exactly the same as the one obtained through
the ServerSocket class in Server.java.
This time, the input stream is obtained and a
BufferedReader is instantiated using it. The data
is read from this stream and displayed to the screen. Simple yet
again!
Swing is a rapid GUI development tool that is part of the standard
Java development kit. It was primarily developed due to the
shortcomings of the Abstract Windows Toolkit (AWT). For example,
Swing's JButton class enhances the AWT
Button class to allow not only text, but images on
the button. In addition, all Swing components support assistive
technologies.
I am only going to go over a few basic Swing components:
JFrame
JPanel
JButton
JFrame and choose its layout. Then
you put one or more JPanels in the JFrame
if you want to. JPanels also have different layout
options like JFrames do. After that, you add other components.
The following is the code corresponding to what I just said. It
can also be found in
SimpleGui1.java.
import java.lang.*;
import java.util.*;
import java.awt.*;
import java.awt.event.*;
import javax.swing.*;

class SimpleGui1 {
   public static void main(String args[]) {
      // Let's make a button first
      JButton btn = new JButton("Click Me!");
      btn.setMnemonic(KeyEvent.VK_C); // Now you can hit the button with Alt-C

      // Let's make the panel with a flow layout.
      // Flow layout allows the components to be
      // their preferred size.
      JPanel pane = new JPanel(new FlowLayout());
      pane.add(btn);  // Add the button to the pane

      // Now for the frame
      JFrame fr = new JFrame();
      fr.setContentPane(pane);  // Use our pane as the default pane
      fr.setDefaultCloseOperation(JFrame.EXIT_ON_CLOSE); // Exit program when frame is closed
      fr.setLocation(200, 200); // located at (200, 200)
      fr.pack();                // Frame is ready. Pack it up for display.
      fr.setVisible(true);      // Make it visible
   }
}
And here is the result:
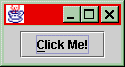
The JButton, JPanel, and
JFrame actually have a ton of more options you
can set. Check out the Java documentation for the whole deal.
In this simple example, clicking the button does nothing,
but clicking the "X" at the top right automatically exits
the program completely.
Now to put something behind this simple little GUI that we have built. Functionality can be added to clickable GUI components through event handlers. This is done by adding a listener object to a component. Whenever any action is done on the component, the appropriate listeners are triggered and their appropriate methods (event handlers) are invoked. To see how this works, let's modify the example above:
import java.lang.*;
import java.util.*;
import java.awt.*;
import java.awt.event.*;
import javax.swing.*;

class SimpleGui2 {
   private static JFrame fr = null;
   private static JButton btn = null;

   public static void main(String args[]) {
      // Let's make a button first
      btn = new JButton("Click Me!");
      btn.setMnemonic(KeyEvent.VK_C); // Now you can hit the button with Alt-C
      btn.addActionListener(new ButtonListener()); // Allow the button to disable itself

      // Let's make the panel with a flow layout.
      // Flow layout allows the components to be
      // their preferred size.
      JPanel pane = new JPanel(new FlowLayout());
      pane.add(btn);  // Add the button to the pane

      // Now for the frame
      fr = new JFrame();
      fr.setContentPane(pane);  // Use our pane as the default pane
      fr.setDefaultCloseOperation(JFrame.EXIT_ON_CLOSE); // Exit program when frame is closed
      fr.setLocation(200, 200); // located at (200, 200)
      fr.pack();                // Frame is ready. Pack it up for display.
      fr.setVisible(true);      // Make it visible
   }

   // Button event handler
   static class ButtonListener implements ActionListener {
      public void actionPerformed(ActionEvent e) {
         btn.setEnabled(false); // Disable the button
      }
   }
}
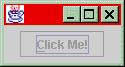
Now this brings up the same window that the first one did. However, if you click the button, it disables itself:
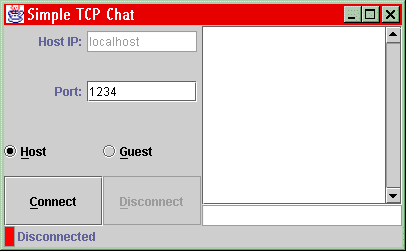
To see something a lot more complex, check out my preliminary
design for the TCP chat program:
Gui.java. The GUI looks
like this:

Try clicking the connect and disconnect buttons and see what happens. This program is a lot simpler than the actual TCP chat program which you will see later.
Going from AWT to Swing results in a little issue with threads. All AWT classes are thread safe; Swing's classes are not. A little knowledge about threads is necessary to completely understand the reason for the complexity of using threads. Sun's Java Tutorial covers this topic very well, so you might want to take a peek there. Consider an object that has been instantiated in one thread. Now this object needs to be modified by two or more threads. Data can easily be corrupted if two threads try to modify the same object at the same time. Of course, you know there is no such thing as "the same time" when it comes to threads since the operating system switches between the various threads to make them seem like they are running concurrently. However, if one thread is interrupted while it is modifying an object and a second thread is initiated so that it begins to modify that object, data can get corrupted.
There are a couple of ways to get around this problem in Java.
Java allows a way to enforce that no thread modifies the
same object that your thread is modifying through the use of
the synchronize keyword. You can read up about
it in Sun's Java tutorial since it is out of the scope of this
tutorial. Synchronizing an object before modifying it blocks any
other threads attempting to access the synchronized
object until your synchronize block is done.
AWT's methods synchronize on their corresponding
object instantiation, which prevents the objects (eg. buttons,
panels, etc.) on the screen from being corrupted while they are
being drawn. However, this can block your thread if it is trying
to access the AWT object. This just slows things down.
For more information on threads and synchronization, click
here.
Swing, as I mentioned above, is not thread-safe. This means that
most of its methods do not synchronize with the internal
state of the Swing object. Only a few functions that are marked
as thread-safe in the Java documentation are safe to execute
from anywhere. The programmer is now given the
responsibility of making sure that there are no thread conflicts.
This can be done by making sure that all the modifications to the
Swing objects happen in the same thread. All the events - such as
button clicks and others - are handled on the thread known
as the event-handling thread. This thread is also where all the
component painting onto the screen is done. Hence, any modifications
to the visible Swing components can be made in any event handling
routine. For example, in the SimpleGui2 class above,
the properties of the button are modified in the
ButtonListener class, whose method is executed on the
event-handling thread every time the button is clicked.
Now, what if you have to modify an object without receiving any
events? Swing allows you to run a class that implements the
Runnable interface on the event-handling thread. This
is done using the SwingUtilities.invokeLater(runnableObj);
method. For example, runnableObj is an instantiation of a class
that implements the Runnable interface.
SwingUtilities.invokeLater(runnableObj); will queue
the runnableObj.run() method on the event-handling queue,
and the method will eventually execute and be able to modify the Swing
components. If you see the TCPChat code, you will see
that that is exactly what I have done to update the GUI with the state
of the program.
For more information and examples with Swing and threads, click
here.
The chat program is in
TCPChat.java.
It implements both the client and the server side, which is not too
hard, since both use the Socket class. It would take much
too long to detail every portion of the program, so I will just tell
you how to use it, and you can check out the code to see how its done.
Firstly, this is what the final product looks like:
When two people want to chat using this program, each has to have an
instance of it running on his/her computer. This program will also
work with two instances on the same computer through
localhost, as mentioned above in the TCP Sockets section.
To use the chatting program, do the following:
All of my information is directly from Sun's Java 2 Documentation, and Java Tutorial, both of which are accessible at Sun's Java home page. Here is a list of useful links: